Ever found yourself lost in the maze of trip planning, juggling between guidebooks, maps, and apps? What if there was a way to weave all your travel dreams into one seamless plan? Google Maps isn’t just about finding directions anymore it’s a powerful tool that can transform the way you plan your journeys. Let’s unravel how you can craft the perfect itinerary, turning your adventures into unforgettable experiences with Google Maps.
Introduction
Planning a trip is like setting the stage for an extraordinary performance. Every detail counts, and with the right tools, the process becomes a thrilling part of the journey itself. Google Maps itinerary planning offers a dynamic and interactive way to chart your travels, uncovering hidden gems and tailoring every step to your preferences. Together, let’s embark on a step-by-step exploration of how Google Maps can be your ultimate travel companion.
What Is Google Maps Itinerary Planning?
Imagine having a personal guide who knows every corner of the world, ready to help you craft the perfect journey. That’s what Google Maps itinerary planning brings to the table, a comprehensive platform that allows you to design, customize, and visualize your entire trip with ease.
At its core, Google Maps itinerary planning lets you create personalized maps where you can:
- Pinpoint Destinations: Mark all the places you wish to visit.
- Organize Points of Interest: Categorize locations into layers like restaurants, museums, or parks.
- Customize Routes: Determine the best paths between your stops.
- Add Personal Notes: Include reminders, comments, or special tidbits about each place.
Why Use Google Maps for Trip Planning?
“Can’t I just use a travel guide or another app?” you might wonder. Google Maps stands out in a crowded field of travel planning tools, and here’s why it’s the go-to choice for savvy travelers like ourselves.
- Unparalleled Global Coverage: Google Maps boasts comprehensive data from every corner of the globe. Whether you’re navigating the bustling streets of Tokyo or the remote trails of the Swiss Alps, it’s got you covered.
- Real-Time Updates: The world is ever-changing, and so are travel conditions. Google Maps provides live traffic updates, public transit schedules, and alerts about road closures or construction. It’s like having a local informant whispering insider tips.
- Integrated Search and Reviews: Looking for the best sushi restaurant nearby? Search within the app and access millions of reviews, photos, and ratings from fellow travelers. It’s personalized, community-driven guidance at your fingertips.
- Customization and Personalization: Unlike static maps or guides, Google Maps lets you tailor your journey. Add notes, set labels, and even change the icons for your pinned locations. It’s your adventure, crafted your way.
- Cross-Device Accessibility: Start planning on your desktop, make tweaks on your tablet, and navigate on your smartphone. Your itinerary syncs seamlessly across devices, ensuring you’re always connected to your plan.
- Offline Access: Traveling to areas with limited internet? Download maps for offline use, ensuring you’re never lost, even without a connection.
Consider this analogy: If travel planning were like cooking, Google Maps would be your all-in-one kitchen, a place where you have all the ingredients and tools to create the perfect dish. Other apps might offer specific functionalities, but none bring together such a rich tapestry of features in one place.
Additionally, for those of us who appreciate a user-friendly interface, Google Maps is intuitive and easy to navigate. You don’t need to be tech-savvy to harness its power.
In essence, using Google Maps for trip planning simplifies the complex, unites the fragmented, and empowers you to focus on what really matters while enjoying the journey.
How to Plan an Itinerary with Google Maps
Embarking on a new adventure is thrilling, but planning it can sometimes feel overwhelming. Fear not, fellow traveler! With Google Maps by your side, planning becomes part of the excitement. Let’s dive into a step-by-step guide to crafting your perfect itinerary.
Step 1: Set Up Your Google Maps Account
Before we start mapping out our grand adventure, it’s essential to have the right foundation for your Google account. This account is the gateway to saving and syncing your maps, ensuring your itinerary is accessible wherever you go.
Getting Started
Create or Sign In to Your Google Account:
- If you don’t have a Google account, head over to accounts.google.com/signup to create one.
- Already have one? Simply sign in.
Access Google Maps:
- Navigate to maps.google.com on your preferred web browser.
- Alternatively, download the Google Maps app on your smartphone or tablet.
Why Is This Step Crucial?
- Sync Across Devices: By signing in, your saved places and custom maps are accessible on any device. Plan on your laptop, navigate on your phone, it all stays connected.
- Personalized Experience: Google learns from your interactions to provide tailored recommendations. It’s like having a concierge who knows your preferences.
- Collaboration Made Easy: Sharing your itinerary with travel companions becomes seamless.
Privacy and Security
We value our privacy, and so does Google. Here are ways to ensure your data stays secure:
- Manage Your Data: Adjust what information Google saves in your account settings.
- Turn On Incognito Mode in Maps: For private searches and navigation, use incognito mode.
Creating a Travel-Specific Account (Optional)
If you prefer separating your travel planning from personal or work accounts:
- Create a New Google Account: Dedicated solely to your travel plans.
- Share Access: Grant permission to your main account or collaborators.
Final Thoughts
Setting up your account may seem straightforward, but it’s the key that unlocks all the powerful features we’ll explore. Think of it as packing your suitcase essential before any trip.
Step 2: Create a Custom Map with Google My Maps
Now that your account is set up, it’s time to bring your travel dreams to life by creating a custom map. This personalized map will be your canvas, where you can pin destinations, draw routes, and add notes that detail every aspect of your journey.
Accessing Google My Maps
- Visit: Google My Maps
- Click: Create a New Map
Crafting Your Map
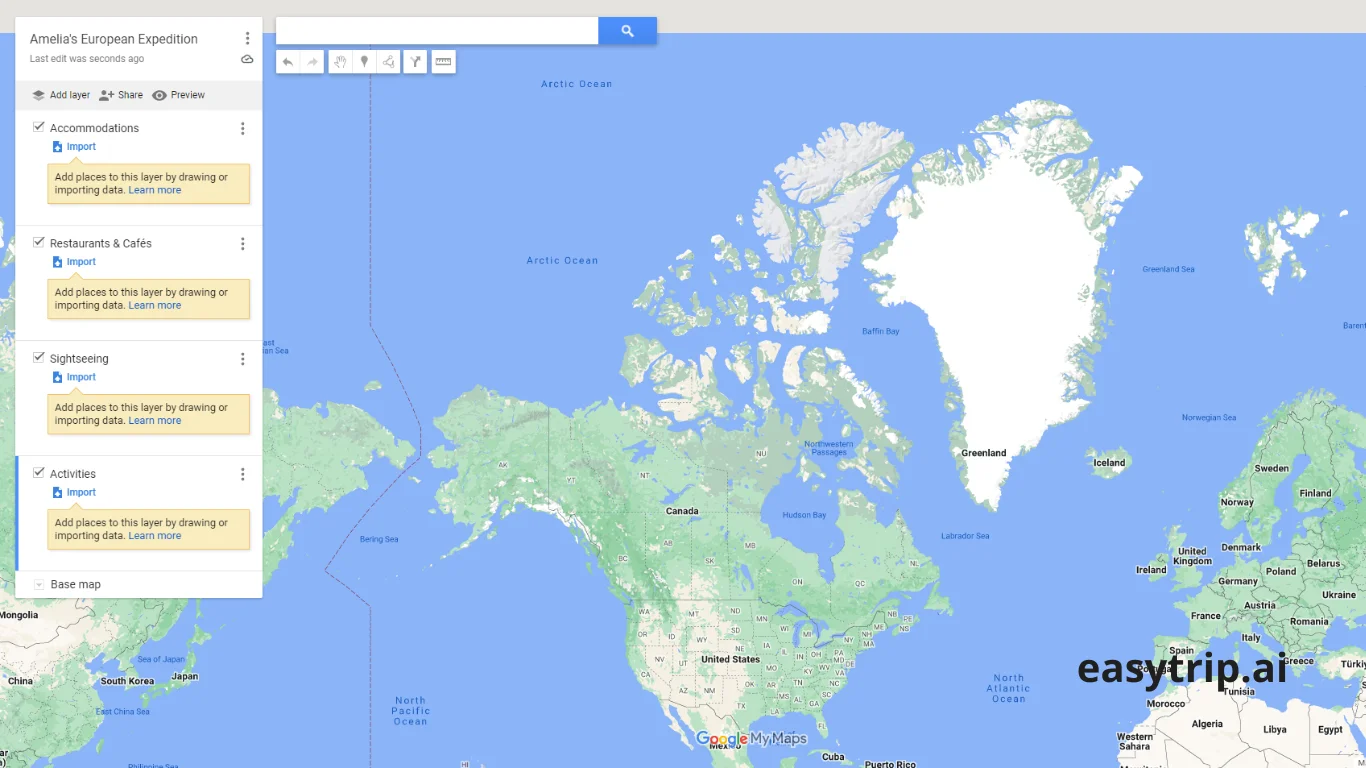
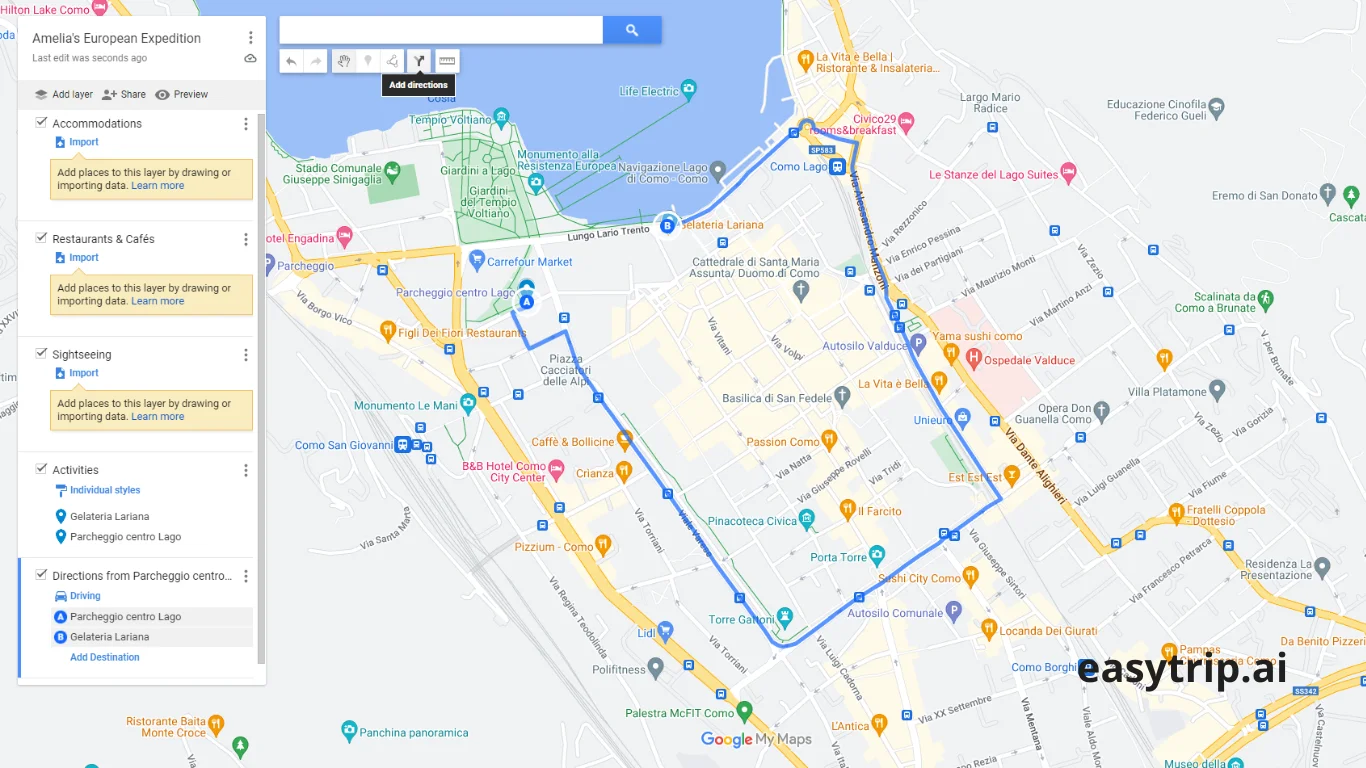
- Name Your Map:
- Click on the Untitled map at the top left corner.
- Give it a memorable name, like “Amelia’s European Expedition” or “Family Road Trip USA 2023”.
- Add Layers for Organization:
- Layers act like folders in your map, helping you categorize destinations.
- Examples of layers:
- Accommodations
- Restaurants & Cafés
- Sightseeing
- Activities
- Click Add layer to create as many as you need.
- Customize the Base Map:
- Click the drop-down menu where it says Base map.
- Choose from options like Satellite, Terrain, or Simple Atlas to suit your preference.
Why Use Google My Maps?
- Personalization: Tailor every aspect of your map to reflect your interests.
- Detailed Planning: Go beyond basic pins and include routes, notes, and custom icons.
- Collaboration: Easily share and edit with others.
Adding Style and Flair
- Custom Icons:
- Use different icons for different types of locations.
- For instance, a bed icon for accommodations, a fork and knife for restaurants.
- Color-Coding:
- Assign colors to markers based on categories or priority.
- For example, red for must-see attractions, blue for optional stops.
Example
Suppose you’re planning a trip to Japan:
- Layer 1: Tokyo
- Accommodation: Hotel in Shibuya (blue bed icon)
- Sightseeing: Meiji Shrine (green star icon), Tokyo Tower (orange tower icon)
- Food: Tsukiji Fish Market (purple fork and knife icon)
- Layer 2: Kyoto
- Accommodation: Ryokan in Gion
- Sightseeing: Fushimi Inari Shrine, Arashiyama Bamboo Grove
Pro Tips
- Utilize the Search Bar: Find locations quickly and add them directly to your map.
- Save Frequently: Though Google My Maps autosaves, it’s good practice to ensure your latest changes are stored.
In Summary
Creating a custom map with Google My Maps is like laying out the blueprint of your adventure. It’s where your itinerary begins to take shape, transforming ideas into a visual plan that’s both functional and inspiring.
Step 3: Add Destinations and Points of Interest
With your custom map framework in place, it’s time to fill it with the exciting destinations and experiences you don’t want to miss.
Searching and Adding Locations
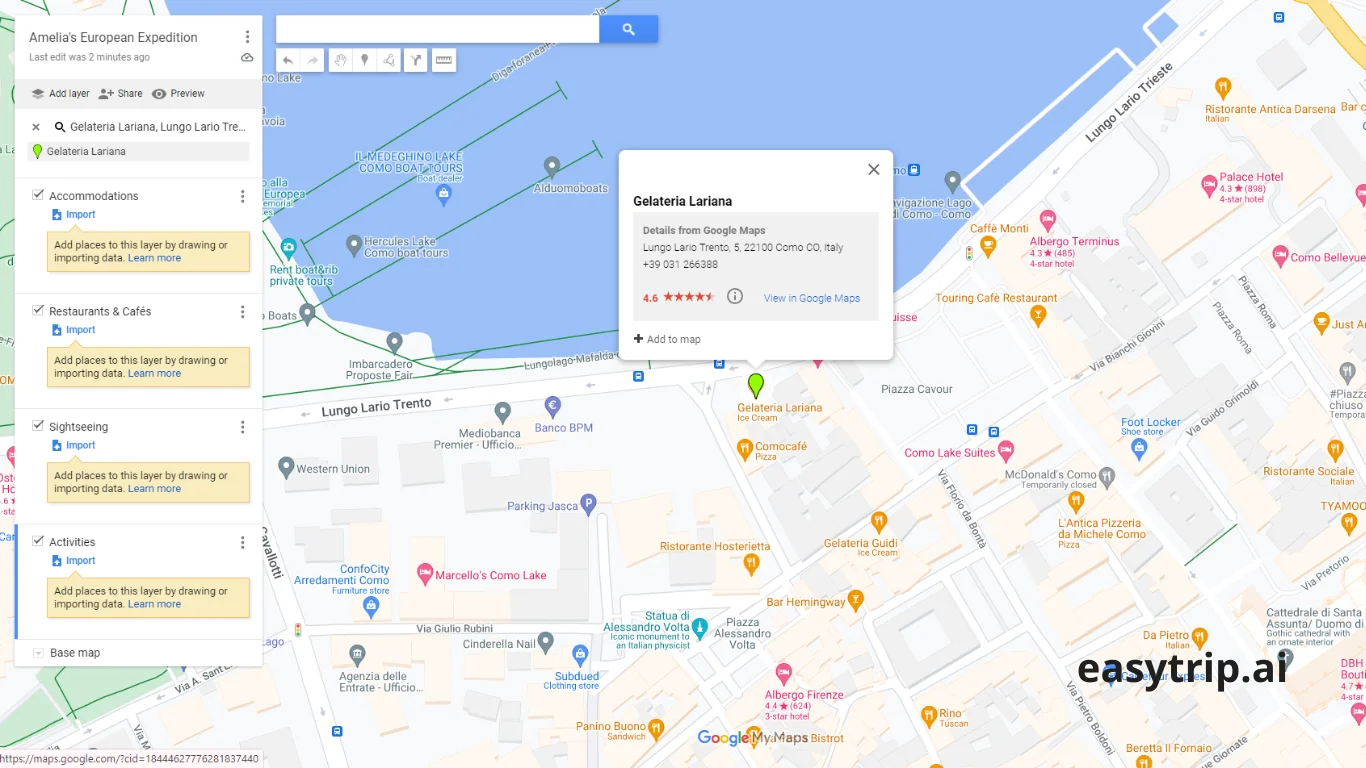
- Use the Search Bar:
- Enter the name of a place (e.g., “Colosseum”) or a type of location (e.g., “best gelato in Rome”).
- Select the correct result from the suggestions.
- Add to Your Map:
- After selecting a location, click Add to map.
- Choose the appropriate layer to keep things organized.
- Manual Placements:
- Can’t find a spot? Use the Add marker tool to place a pin manually.
- Perfect for adding specific viewpoints or local recommendations.
Enhancing Your Markers
- Add Notes and Descriptions:
- Click on a marker, select the Edit icon, and jot down important details.
- Include operating hours, ticket prices, or personal reminders.
- Attach Photos and Videos:
- Make your map more engaging by adding visuals.
- Helps in recalling why you wanted to visit a place.
Categorizing for Clarity
- Essential vs. Optional:
- Differentiate between must-see spots and places you’d like to visit if time allows.
- Use symbols or colors to indicate priority.
- Grouping by Proximity:
- Cluster locations that are near each other.
- Helps in planning daily itineraries and reducing travel time.
Leveraging Lists and Labels
- Create Lists:
- In the Google Maps app, use Saved Places to create lists like “Bucket List” or “Date Night Ideas”.
- Though separate from My Maps, they can complement your planning process.
- Use Labels:
- Label key locations like your hotel or meeting points.
- Labels are visible only to you for privacy.
Example
You’re planning a food tour in Barcelona:
- Layer: Tapas Bars
- Bar La Plata: Noted for its traditional sardines.
- Quimet & Quimet: Famous for montaditos and vermouth.
- Layer: Markets
- La Boqueria: Added notes about the best stalls and peak times to visit.
Pro Tips
- Check Reviews and Ratings: Before adding a spot, glance at what others say.
- Consider Travel Time: Be mindful of how long it takes to get from one place to another.
In Essence
By thoughtfully adding destinations and points of interest, you’re creating a rich tapestry of experiences. Your custom map becomes more than a tool it’s a reflection of your travel aspirations, meticulously organized and ready to guide you on your journey.
Step 4: Customize Your Route and Travel Preferences
Now that your map is dotted with exciting destinations, it’s time to connect the dots. Customizing your routes ensures a smoother journey, saving you time and enhancing your overall travel experience.
Planning Routes Between Destinations
- Add Directions:
- Click the Add directions icon (looks like an arrow) beneath the search bar.
- A new layer named Untitled layer will appear, dedicated to directions.
- Set Starting Point and Destination:
- A: Your starting location (e.g., hotel).
- B: First destination.
- Continue adding locations by clicking + Add destination.
- Choose Mode of Transportation:
- Select between Driving, Walking, Cycling, or Public Transit icons.
- Each mode adjusts the route accordingly.
Optimizing Your Route
- Drag-and-Drop Destinations:
- Rearrange the order of your destinations for efficiency.
- Simply click and drag the markers in the list.
- Adjust Routes Manually:
- Click on the route line and drag it to a different road or path.
- Useful for scenic drives or avoiding certain areas.
Set Travel Preferences
- Avoid Tolls or Highways:
- In the directions layer, click on Options.
- Check Avoid tolls, Avoid highways, or Avoid ferries as needed.
- Time Estimates:
- Google Maps provides estimated travel times.
- Factor these into your daily schedule.
Accounting for Traffic and Transit Schedules
- Live Traffic Updates:
- While My Maps doesn’t show live traffic, switching to standard Google Maps can help you assess current conditions.
- Public Transit Timetables:
- Check for schedules, especially if traveling in less frequent rural areas.
Example
You’re exploring San Francisco:
- Morning:
- Start at Golden Gate Bridge.
- Walk to Crissy Field.
- Afternoon:
- Take a bus to Fisherman’s Wharf.
- Ferry to Alcatraz Island (note tour times).
- Evening:
- Uber to Chinatown for dinner.
Pro Tips
- Multiple Layers for Different Days:
- Separate routes and destinations by day for clarity.
- Backup Routes:
- Plan alternative paths in case of closures or delays.
Considering Accessibility
- Mobility Needs:
- Check if routes are wheelchair accessible.
- Include elevators, ramps, or escalators in plans.
Final Thoughts
Customizing your route is like choreographing a dance: you decide the rhythm and flow of your journey. By shaping your path thoughtfully, you enhance not just efficiency but also the joy of exploration, making every step align with your travel aspirations.
Step 5: Save and Share Your Itinerary
With your itinerary crafted to perfection, the final step is to save your masterpiece and share it with your travel companions or across your devices. This ensures everyone’s on the same page and can access the plan whenever needed.
Saving Your Map
- Auto-Save Feature:
- Google My Maps usually saves changes automatically.
- To be safe, look for the Saving… indicator to confirm.
- Accessing Your Map Later:
- Visit Google My Maps and sign in.
- Your saved maps will appear under Owned or Not owned tabs.
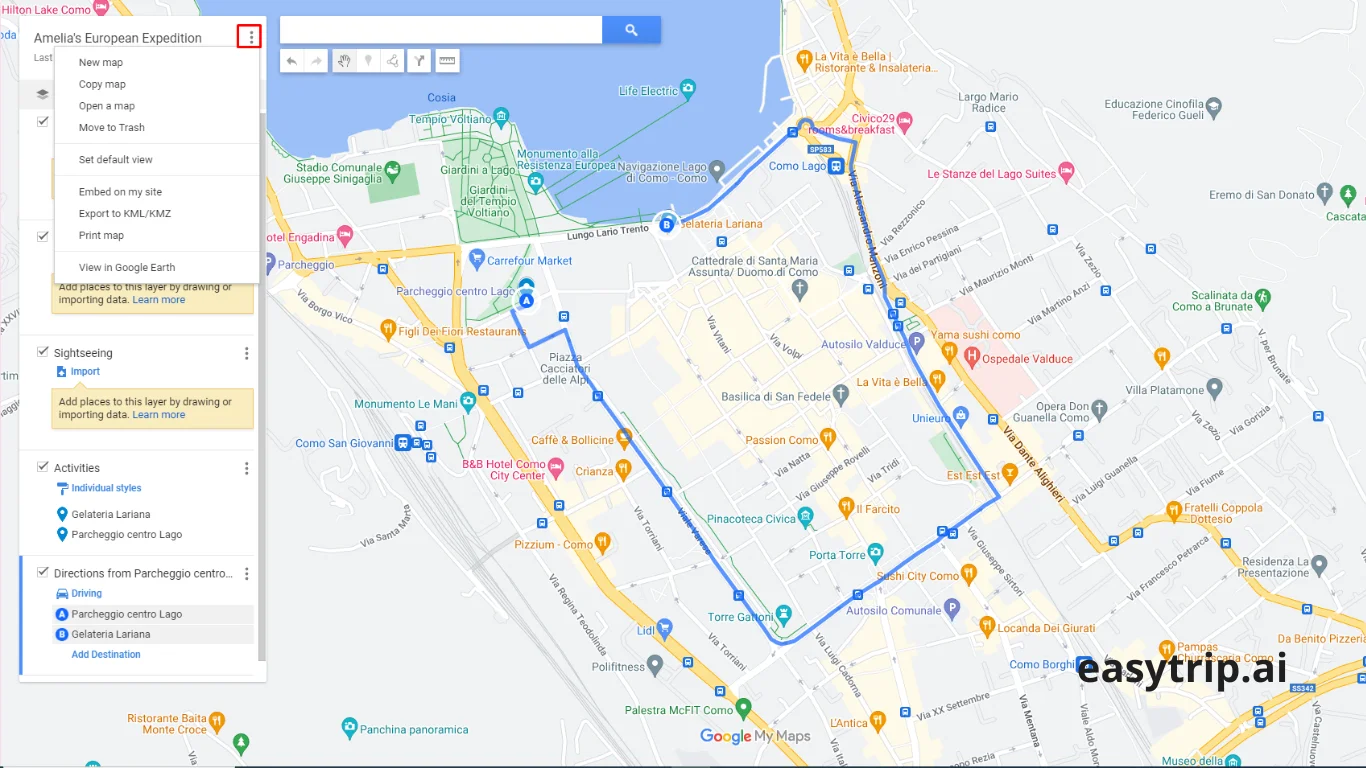
Exporting Your Map
- Download for Offline Use:
- Click on the Three Dots (More) next to your map’s title.
- Select Export to KML/KMZ.
- Choose to download the entire map or specific layers.
- Integration with Other Apps:
- Use the exported file with GPS devices or other mapping software.
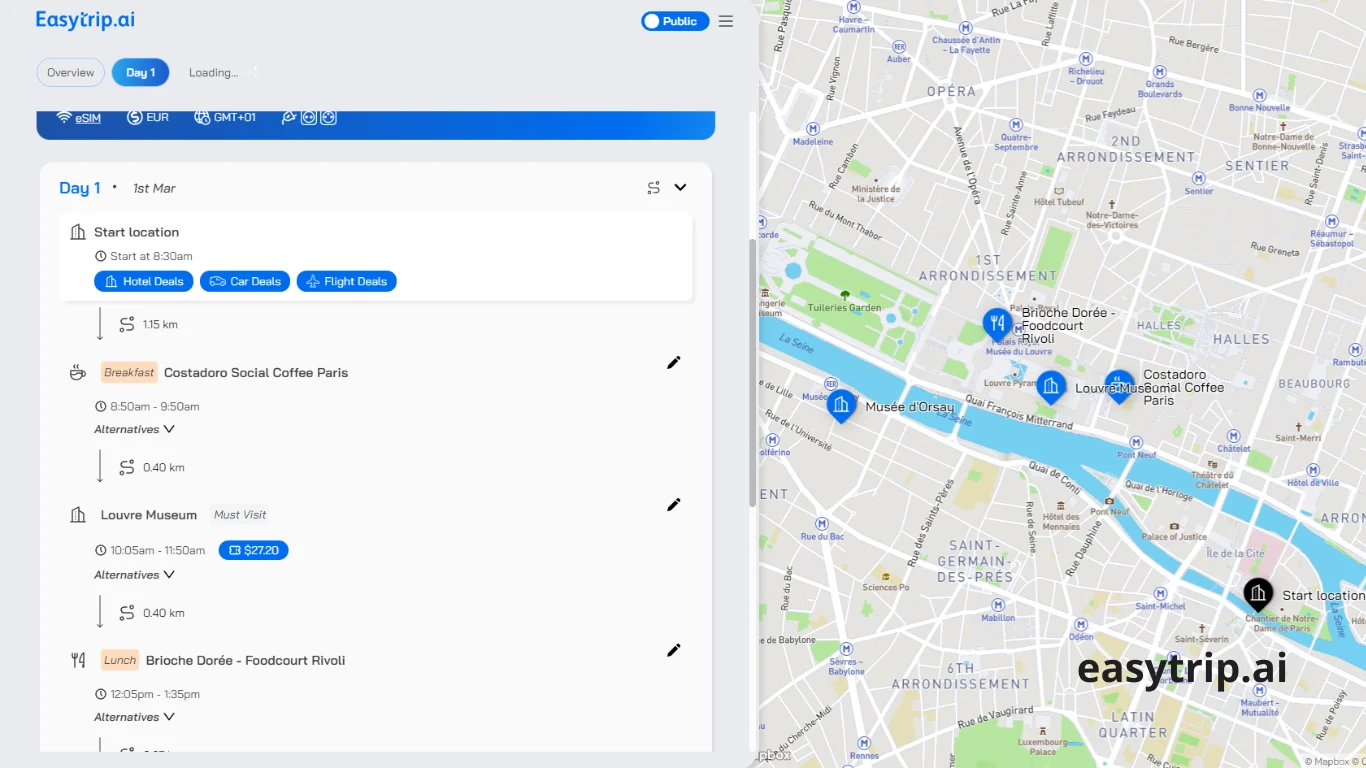
You can do from step 1 to 5 with just 1 click with easytrip ai (the picture below)
Sharing Your Map
- Click on Share:
- Located below the map’s title.
- Set Permissions:
- Private: Only you can access.
- Shared: Specific people can view or edit.
- Public on the web: Accessible by anyone with the link (use cautiously).
- Invite Collaborators:
- Enter email addresses.
- Assign permissions: Can view or Can edit.
- Sharing the Link:
- Copy the link provided and share it via email, messaging apps, or social media.
Benefits of Sharing
- Collaborative Planning:
- Travel partners can add or adjust destinations.
- Encourages input and ideas from the group.
- Easy Access:
- Everyone can access the itinerary on their devices.
- Reduces miscommunication.
Printing Your Map
- For a Physical Copy:
- Click on Print Map in the More options.
- Customize the print layout and content.
Example
You’re organizing a family reunion trip:
- Share the itinerary with family members.
- Aunt Linda adds a historic site she wants to visit.
- Your cousin Mark adjusts the dining options for his dietary needs.
Pro Tips
- Set Editing Guidelines:
- Avoid confusion by agreeing on how edits should be made.
- Regularly Check for Updates:
- Stay informed about changes collaborators make.
In Summary
Saving and sharing your itinerary ensures that your travel plans are not just confined to your own device but are a shared blueprint for an unforgettable journey. It fosters collaboration and keeps everyone connected, making the planning process as enjoyable as the trip itself.
Features of Google Maps for Itinerary Planning
As we’ve journeyed through planning our itinerary, it’s evident that Google Maps is more than just a navigation tool, it’s a comprehensive travel companion brimming with features designed to enhance your experience. Let’s delve into some of the standout features that make it an indispensable asset for travelers like us.
Route Optimization for Efficient Travel
Time is precious when exploring new destinations, and route optimization helps you make the most of every moment. Google Maps excels in finding the most efficient paths to connect your chosen destinations.
Understanding Route Optimization
- Efficient Sequencing:
- Arranges stop in the optimal order.
- Minimizes travel time and distance.
- Adaptable Routing:
- Adjusts routes based on real-time conditions.
Benefits
- Saves Time:
- Less time spent on the road means more time enjoying the sights.
- Reduces Costs:
- Efficient routes can save on fuel or transit expenses.
- Eco-Friendly:
- Shorter travel distances reduce your carbon footprint.
How to Optimize Routes in Google Maps
- Add Multiple Destinations:
- In the directions feature, add all your planned stops.
- Use the ‘Optimize’ Function:
- Though primarily available in Google Maps APIs for businesses, you can manually arrange stops for efficiency.
Alternative Tools
- For complex itineraries with many stops, consider using additional tools like Google’s Route Planner within the Google Maps Platform.
Example
You’re delivering supplies to several locations in Los Angeles:
- Input all destinations.
- Arrange them in a sequence that forms a loop rather than zig-zagging across the city.
Pro Tips
- Consider Peak Traffic Times:
- Adjust your schedule to avoid rush hours.
- Regularly Update Your Plan:
- Re-assess routes if new stops are added or conditions change.
In Summary
Route optimization is like having a skilled navigator on board, ensuring you reach all your desired locations in the most effective manner. It’s about traveling smarter, not harder.
Real-Time Traffic and Navigation Updates
Nothing can derail a trip faster than unexpected traffic jams or transit delays. Thankfully, Google Maps provides real-time updates to keep you ahead of the curve.
Live Traffic Conditions
- Color-Coded Traffic Lines:
- Green: Smooth sailing.
- Yellow/Orange: Moderate traffic.
- Red: Heavy congestion.
- Incident Reports:
- Alerts about accidents, construction, or road closures.
Public Transit Updates
- Schedules and Delays:
- Real-time departure and arrival times.
- Alternative Routes:
- Suggestions if a transit line is disrupted.
Automatic Rerouting
- Dynamic Navigation:
- Google Maps can reroute you if a faster path becomes available.
Voice-Guided Navigation
- Hands-Free Directions:
- Keeps you focused on the road or path.
- Lane Assistance:
- Suggests the optimal lane for upcoming turns or exits.
Example
Driving through Chicago during rush hour:
- Google Maps alerts you to a major accident on your route.
- Suggests an alternative path that saves 20 minutes.
- Arrive at your destination on time and stress-free.
Pro Tips
- Enable Notifications:
- Allow the app to send you updates even when it’s not open.
- Report Conditions:
- Contribute by reporting accidents or hazards you encounter.
Final Thoughts
Real-time updates are like having a personal traffic scout, constantly monitoring conditions to ensure your journey is as smooth as possible.
Offline Maps for Travel Without Internet
Venturing into areas with spotty internet? Google Maps’ offline feature ensures you won’t lose your way even when connectivity does.
Downloading Maps for Offline Use
- Select the Area:
- In the app, search for the city or region.
- Tap on the location’s name at the bottom.
- Download the Map:
- Tap Download.
- Adjust the area to include all desired regions.
- Access Offline Maps:
- Go to Menu > Offline maps to view or manage your downloads.
Features Available Offline
- Turn-by-Turn Navigation:
- For driving routes.
- Place Searches:
- Locate addresses and businesses within the downloaded area.
- Basic Information:
- Access place names, ratings, and phone numbers.
Limitations
- No Traffic Updates:
- Live traffic data isn’t available offline.
- Cannot Access Walking or Transit Directions:
- These require an internet connection.
Example
Hiking in the remote areas of Patagonia:
- Download maps before your trip.
- Navigate trails and find campsites without internet.
- Stay safe and oriented in the wilderness.
Pro Tips
- Regularly Update Offline Maps:
- Maps expire after 30 days; update them to keep information current.
- Manage Storage:
- Offline maps can be large; delete areas you no longer need.
In Essence
Offline maps are like having a trusty paper map, but with the added benefits of digital navigation. It provides peace of mind in the most unpredictable environments.
Adding Notes and Labels for Personalized Itineraries
Personal touches make your itinerary truly yours. Adding notes and labels enhances your map, turning it into a customized guidebook.
Adding Notes
- Edit Place Details:
- Click on a saved location.
- Add personal notes under the description.
- Include Practical Information:
- Reservation numbers.
- Best time to visit.
- Special dietary options.
Using Labels
- Customized Labels:
- Right-click on a location and select Add a label.
- Names like “Our Airbnb”, “Meeting Spot”, or “Must Try!”.
- Visibility:
- Labels are visible only to you, keeping your map organized privately.
Organizing with Icons and Colors
- Differentiate Places:
- Use specific icons for restaurants, hotels, or attractions.
- Color Coding:
- Assign colors to indicate priority or categories.
Creating a Narrative
- Chronological Order:
- Number your stops to follow a sequence.
- Storytelling:
- Add anecdotes or reminders, like “Where we got engaged!”
Example
Planning a romantic getaway in Paris:
- Label Pont des Arts as “Proposed here ❤️”.
- Note at Café de Flore: “Order the hot chocolate”.
Pro Tips
- Use Emojis:
- Add a fun touch to labels and notes.
- Keep It Updated:
- Adjust notes during your trip to reflect changes or new discoveries.
In Summary
By adding notes and labels, your map becomes more than just a navigational tool it transforms into a personalized journal, capturing the essence of your journey.
Advantages of Using Google Maps for Trip Planning
Having explored its features, let’s encapsulate why Google Maps stands as a premier choice for trip planning. Its advantages stretch beyond mere navigation, offering a holistic travel planning experience.
Free and Accessible Across Devices
One of the most compelling benefits is that Google Maps is free and universally accessible.
Cost-Effective
- No Subscription Fees:
- All features are available at no cost.
- Budget-friendly for travelers.
Cross-Platform Availability
- Smartphones and Tablets:
- Apps for both Android and iOS.
- Desktops and Laptops:
- Accessible via web browsers.
- Sync Across Devices:
- Changes saved on one device reflect on all others when signed in.
User-Friendly Interface
- Intuitive Design:
- Easy to navigate, even for the less tech-savvy.
- Regular Updates:
- Continuously improved with new features and enhancements.
Example
You plan your itinerary on your home computer, check it on your tablet during the flight, and navigate on your phone while on the go all without missing a beat.
Pro Tips
- Stay Signed In:
- Ensure consistency and access across devices.
- Update Apps Regularly:
- Benefit from the latest features and security enhancements.
In essence, the accessibility and cost-effectiveness of Google Maps make it an ideal tool for travelers worldwide, regardless of their tech preferences or budgets.
Integration with Google Search and Google Travel
Google Maps seamlessly integrates with other Google services, enhancing its functionality and convenience.
Unified Search Experience
- Direct Access to Information:
- Search for places within Maps and get comprehensive details.
- Rich Content:
- Photos, reviews, and ratings from Google Search appear in Maps.
Google Travel Integration
- Reservation Syncing:
- Flights, hotels, and car rentals booked via Gmail are automatically added to your Maps.
- Trip Summaries:
- Access all your travel information in one place.
Calendar Integration
- Event Locations:
- Addresses from Google Calendar events appear in Maps.
- Time to Leave Notifications:
- Alerts based on current traffic conditions.
Example
After booking a hotel via an email confirmation, Google Maps:
- Automatically saves the hotel location.
- Provides directions and estimated travel time upon arrival.
Pro Tips
- Manage Privacy Settings:
- Control what information is shared across services.
- Leverage Voice Commands:
- Use Google Assistant for hands-free navigation.
Final Thoughts
This integration creates a cohesive ecosystem, simplifying the travel planning process and ensuring all vital information is interconnected and accessible.
Personalized Recommendations Based on Preferences
Google Maps tailors suggestions based on your behavior and preferences, creating a personalized travel experience.
Understanding Your Preferences
- Search History:
- Influences recommendations for restaurants, attractions, and events.
- Location History:
- Provides suggestions based on places you’ve visited.
Customized Suggestions
- ‘For You’ Tab:
- Discover new places to explore, tailored to your tastes.
- Match Scores:
- Indicates how likely you are to enjoy a place.
Local Insights
- Popular Times:
- See when places are busiest.
- Recommendations from Locals:
- Trusted advice from those who know best.
Example
You’re a fan of art museums:
- Google Maps suggests lesser-known galleries in the city you’re visiting.
Pro Tips
- Engage with the App:
- Save places you like to improve recommendations.
- Adjust Preferences:
- Modify settings to refine suggestions.
In Summary
Personalized recommendations enhance your travel experience, introducing you to places and experiences you might not discover otherwise.
Easy Collaboration and Sharing with Travel Partners
Traveling is often a shared experience, and Google Maps makes collaboration effortless.
Sharing Custom Maps
- Invite Collaborators:
- Allow others to view or edit your map.
- Real-Time Updates:
- Changes sync instantly for all users.
Location Sharing
- Real-Time Tracking:
- Share your location temporarily for safety and coordination.
Group Planning
- Collective Input:
- Friends can add suggestions directly onto the map.
- Comments and Notes:
- Discuss plans within the map interface.
Example
You’re arranging a bachelor party trip:
- Each friend adds activities and venues they’d like to visit.
- The group refines the itinerary collaboratively.
Pro Tips
- Set Permissions Carefully:
- Control who can make changes to prevent unwanted edits.
- Use Google Chat or Docs:
- For more detailed discussions alongside your map.
Final Thoughts
Collaboration features transform trip planning into a shared adventure, ensuring everyone’s voice is heard and enhancing the group’s overall experience.
Best Practices for Planning an Itinerary with Google Maps
To maximize the benefits of Google Maps, consider these best practices. They’re designed to streamline your planning process and enrich your travel experience.
How to Organize a Multi-Destination Trip
When your journey includes multiple stops, organization is key.
Create Clear Layers
- By Day or Region:
- Separate layers for each day or geographical area.
- By Category:
- Layers for accommodations, dining, attractions.
Use Consistent Icons and Colors
- Visual Clarity:
- Helps differentiate between types of locations at a glance.
Plan Logistically
- Cluster Nearby Destinations:
- Reduces travel time and fatigue.
- Consider Timing:
- Account for opening hours and peak times.
Example
On a European tour:
- Layer 1: Paris
- Layer 2: Berlin
- Layer 3: Rome
Each layer contains that city’s points of interest, accommodations, and dining options.
Pro Tips
- Review and Revise:
- Regularly update your itinerary as plans evolve.
- Back-Up Plans:
- Include alternatives in case of unexpected closures or delays.
Using Street View for Better Exploration
Street View offers a virtual tour, aiding in preparation and exploration.
Familiarize Yourself
- Neighborhood Layout:
- Recognize landmarks and memorize routes.
- Safety Checks:
- Assess the area’s safety, especially for night-time visits.
Locate Amenities
- Find ATMs, Restrooms, and Pharmacies:
- Useful for planning rest stops.
- Identify Meeting Points:
- Easier coordination with others.
Example
Before visiting a bustling market:
- Use Street View to find the best entrance and nearby parking.
Pro Tips
- Check Image Dates:
- Ensure the images are recent for accuracy.
- Use Indoor Street View:
- Some businesses offer inside views.
Syncing Your Itinerary with Google Calendar
Integrate your itinerary with your schedule for seamless planning.
Add Key Events
- Tours and Reservations:
- Include times, locations, and confirmation details.
- Travel Times:
- Block out periods for transit between destinations.
Set Reminders
- Advance Alerts:
- Notifications 15-30 minutes before departure.
- Daily Summaries:
- Overview of the day’s plans.
Share Calendars
- Group Coordination:
- Keep everyone informed and aligned.
Example
Schedule your museum visit with timed tickets:
- Calendar event includes ticket info and map link.
Pro Tips
- Color-Code Events:
- Differentiate between types of activities.
- Sync Across Devices:
- Access your schedule anywhere.
Final Thoughts
Syncing your itinerary with Google Calendar ensures you’re organized, punctual, and making the most of your time.
Conclusion
Planning an adventure is more than just arranging logistics; it’s about crafting a narrative for your journey. Google Maps emerges as an indispensable ally in this creative process, transforming what was once a daunting task into an engaging and enjoyable experience.
By harnessing its comprehensive features from crafting custom maps and optimizing routes to leveraging real-time updates and personalized recommendations we can tailor every aspect of our trip to align with our desires and needs. This empowers us to explore the world not just as tourists following a guidebook, but as explorers forging our own paths.
Moreover, the ability to collaborate and share enriches our travels, turning solitary plans into shared experiences even before the journey begins. Integrating our itinerary with other tools like Google Calendar further streamlines the process, ensuring we stay organized and focused on what truly matters: immersing ourselves in the adventure.
As we venture into new territories, whether physically or virtually, Google Maps stands as a testament to how technology can enhance our connection with the world. It bridges gaps, overcomes challenges, and opens doors to experiences we might have otherwise missed.
So here’s to the journeys ahead may they be well-planned, richly experienced, and fondly remembered. With Google Maps by our side, the world is not just our oyster; it’s a treasure map waiting to be explored.

